Mil6Print Design Studio – User Guide
Welcome! This comprehensive guide will walk you through every feature of our embroidery design tool, from selecting a garment to downloading your final embroidery files.
1. Getting Started – Interface Overview
The Mil6Print Design Studio has three main areas:
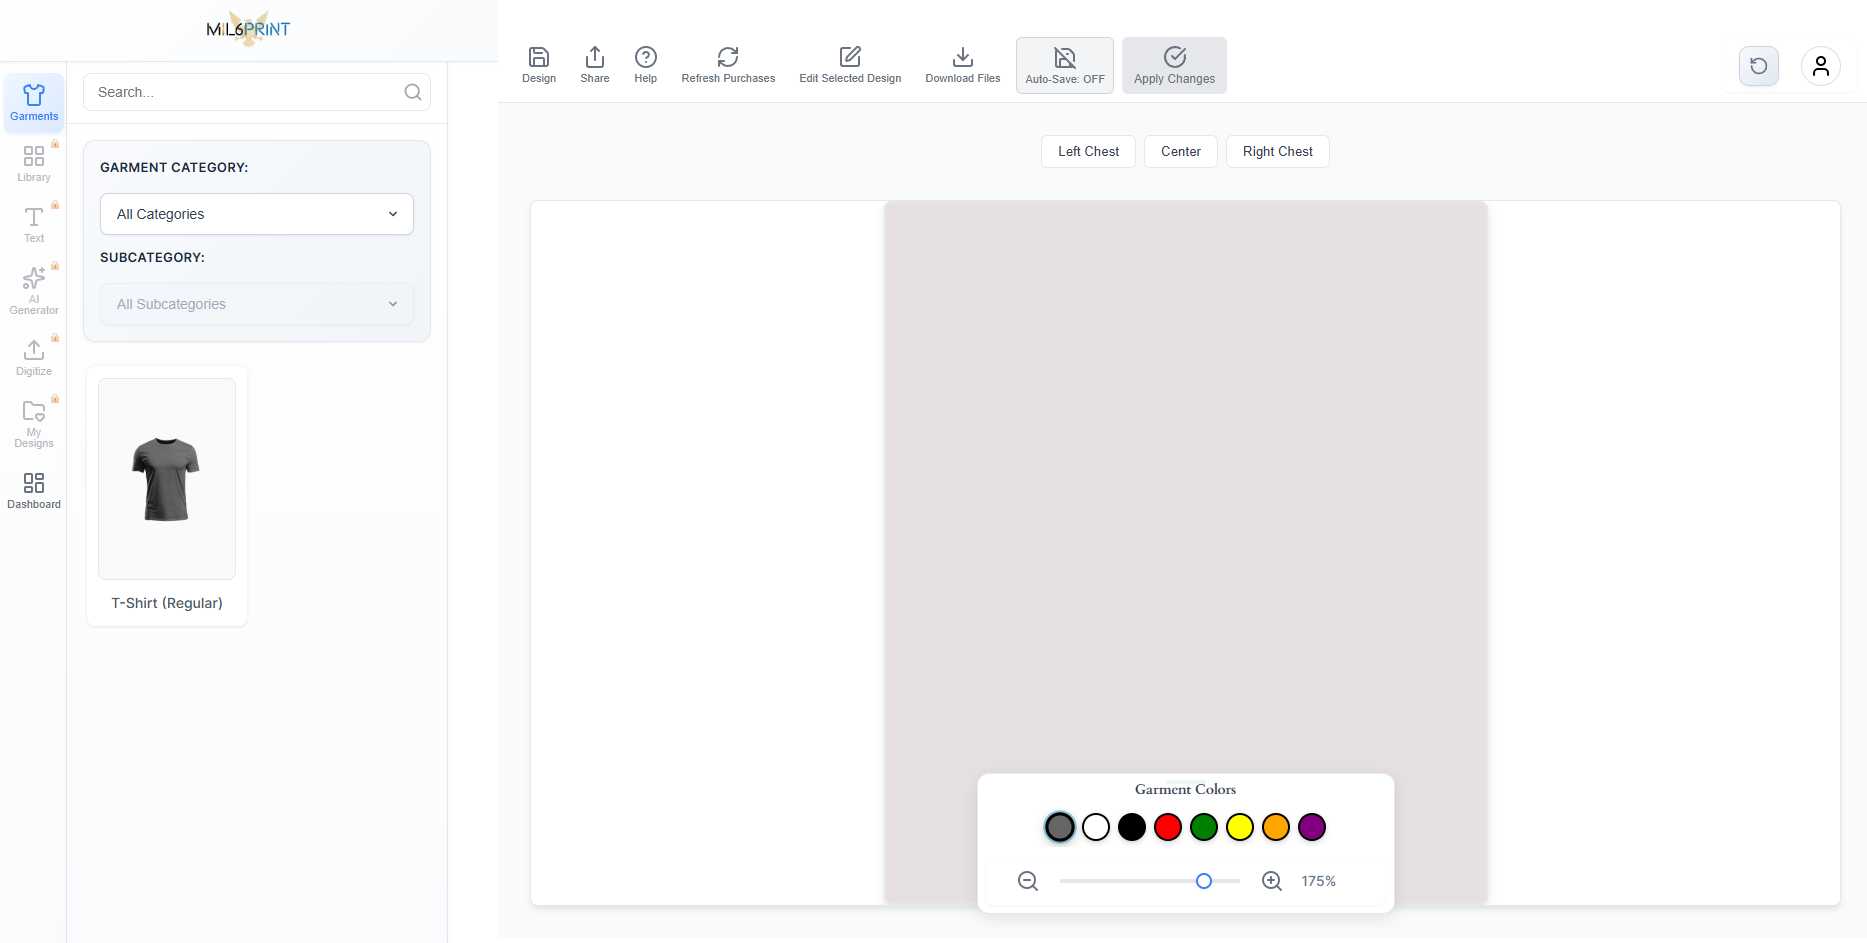
Left Sidebar – Design Tools
The left sidebar contains all your design tools:
- Garments – Select the t-shirt or garment you want to design on
- Library – Browse pre-made embroidery designs
- Text – Add custom text with various fonts and styles
- AI Generator – Create unique designs using AI (requires credits)
- Digitize – Upload your own images to convert to embroidery
- My Designs – Access your saved designs (login required)
- Dashboard – View your orders and download files (login required)
Center – Canvas Area
This is where you preview your design on the garment. You can:
- See your design in real-time on the selected garment
- Move and position design elements
- Switch between garment views (Front, Back, Left, Right)
Top Toolbar – Actions
The top toolbar contains action buttons:
- Design – Save your current design
- Share – Share your design with others
- Help – Opens this guide
- Refresh Purchases – Sync your purchases from the shop
- Edit Selected Design – Modify colors of the selected design
- Download Files – Get your embroidery files after payment
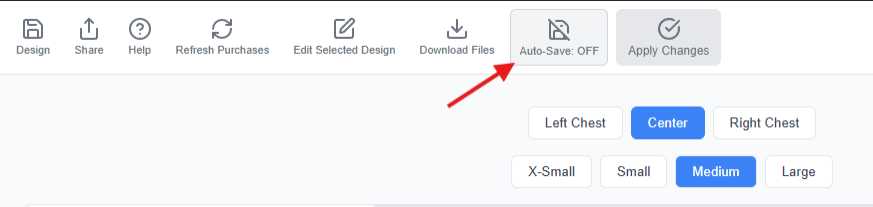
- Auto-Save – Toggle automatic saving of your work
2. Selecting a Garment
Before you can start designing, you must first select a garment to work with.
Step-by-Step:
-
Click on “Garments” in the left sidebar
This opens the garment selection panel.
-
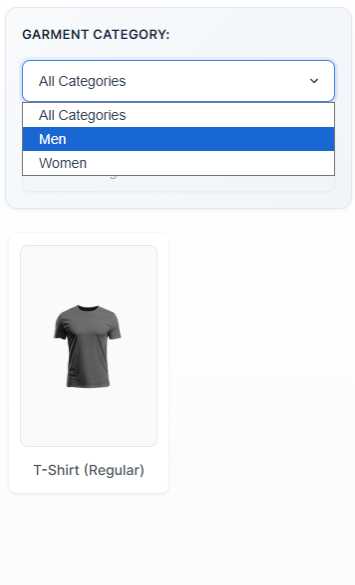
Filter by Category (Optional)
Use the “Garment Category” dropdown to filter by Men, Women, or other categories.
-
Filter by Subcategory (Optional)
If available, use the “Subcategory” dropdown to further narrow your selection (e.g., Summer, Winter).
-
Click on a Garment
Click on the garment image you want to use. It will appear in the canvas area.
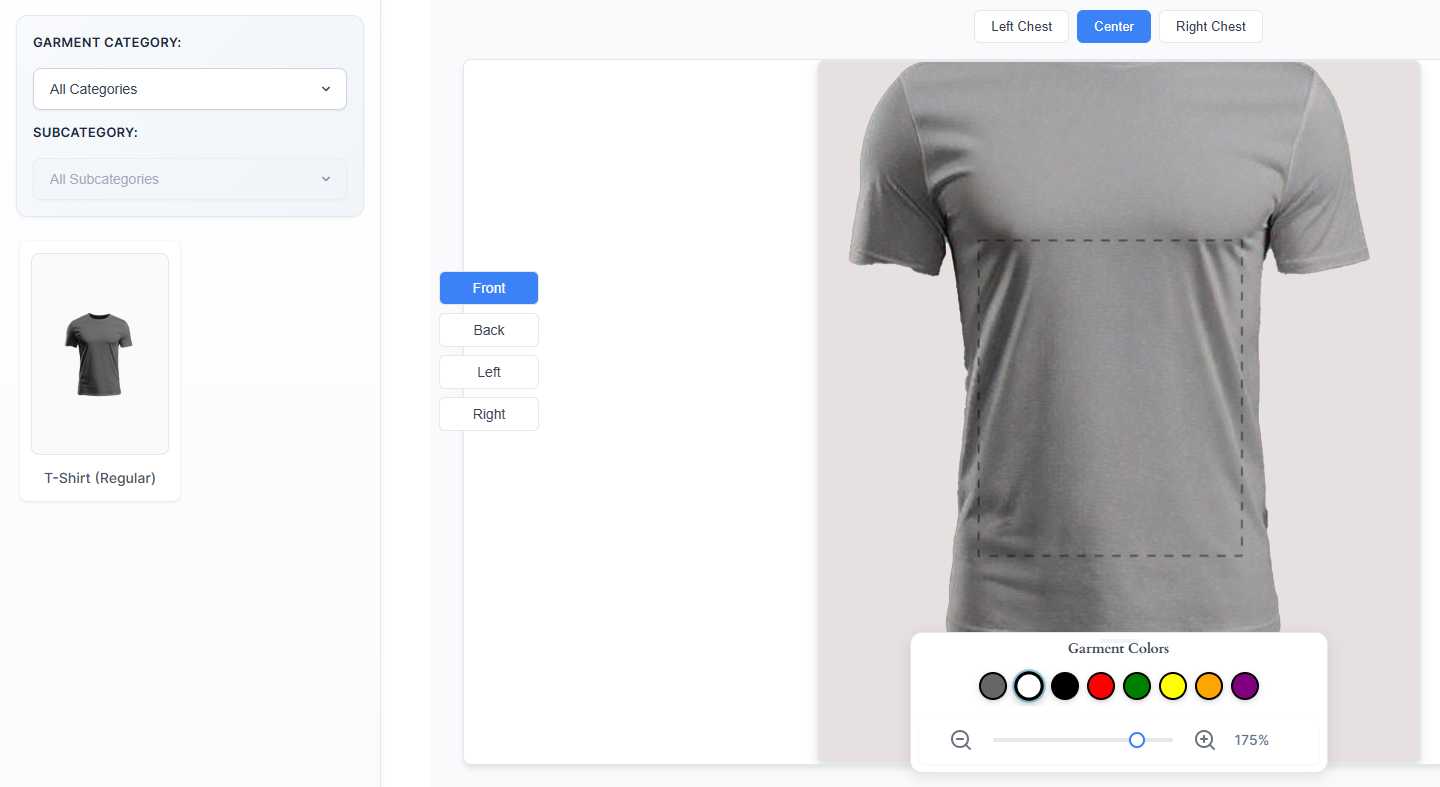
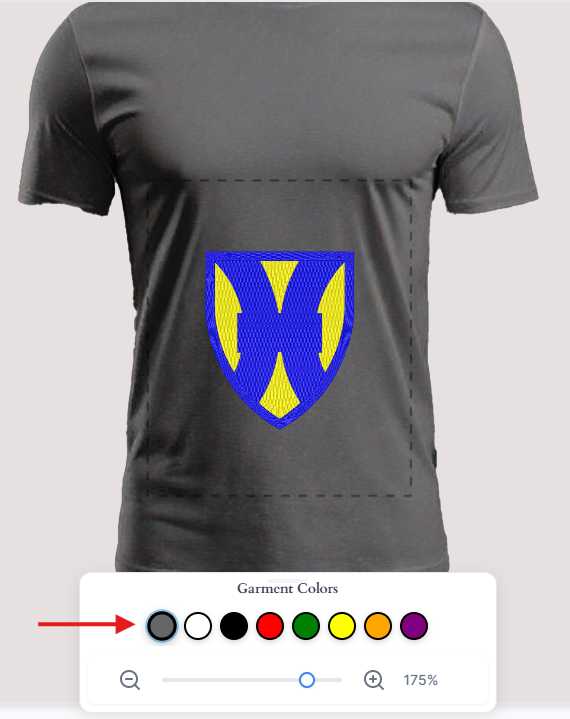
Once a garment is selected, you can change its color using the “Garment Colors” buttons below the canvas.
3. Choosing Design Position & Size
After selecting a garment, you can choose where to place your design and what size it should be.
Design Positions
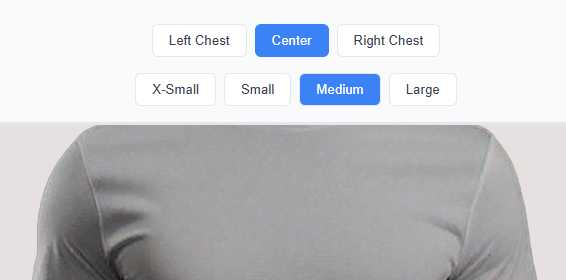
Use the position buttons above the canvas to select where your design will be placed:
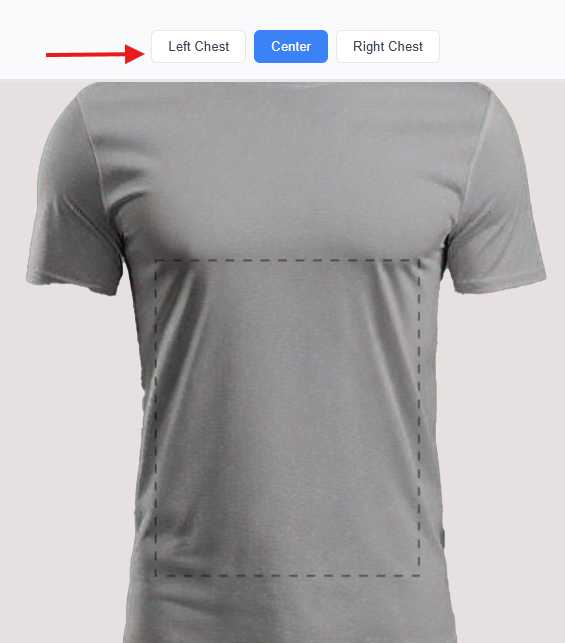
- Left Chest – Small design on the left chest area (typical logo placement)
- Center – Large design in the center of the garment
- Right Chest – Small design on the right chest area
- Back – Design on the back of the garment
- Left/Right – Design on the sleeves (if available)
Garment Views
Switch between different views of the garment using the view buttons:
- Front – Front view of the garment
- Back – Back view of the garment
- Left – Left side view
- Right – Right side view
Design Sizes
Choose the size of your embroidery design:
4. Using the Design Library
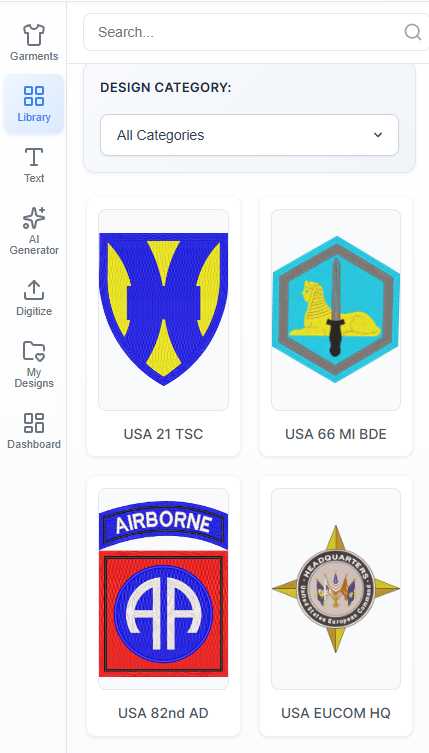
The Library contains pre-made embroidery designs that you can use on your garment.
Step-by-Step:
-
Select a Garment First
You must select a garment before you can access the design library.
-
Click on “Library” in the left sidebar
This opens the design library panel.
-
Filter by Category (Optional)
Use the category dropdown to filter designs by theme.
-
Click on a Design
Click on any design to add it to your canvas. The design will appear on the garment at your selected position.
-
Choose a Size
After selecting a design, use the size buttons (X-Small, Small, Medium, Large) to change its size.
All designs require purchase before you can download the embroidery files. You can preview any design, but downloading requires payment.
5. Adding Custom Text
Add personalized text to your design with various fonts and styles.
Your text box width should NOT be wider than the design area. If the text box extends beyond the design boundaries, the alignment will be disturbed and your text may not appear correctly on the final embroidery.
❌ Wrong – Text Too Wide
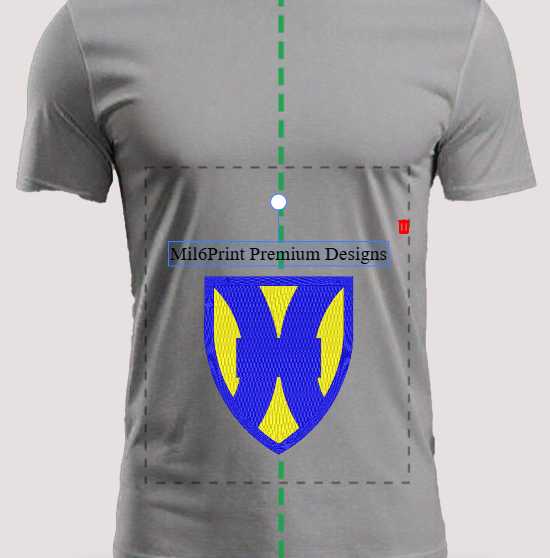
The text extends beyond the design area, causing alignment issues.
✅ Correct – Text Within Bounds
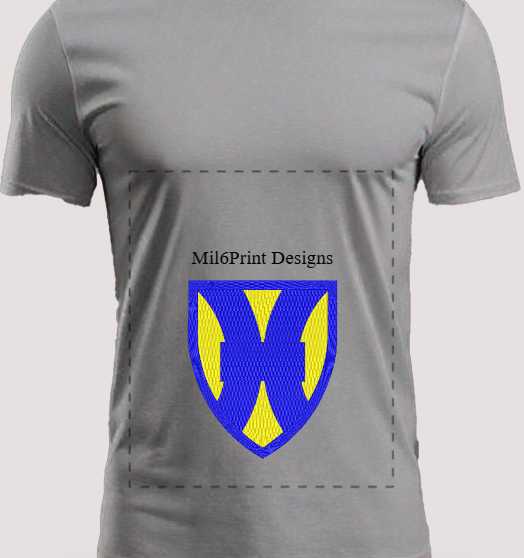
The text fits within the design area, alignment is correct.
Step-by-Step:
-
Select a Garment First
You must select a garment before adding text.
-
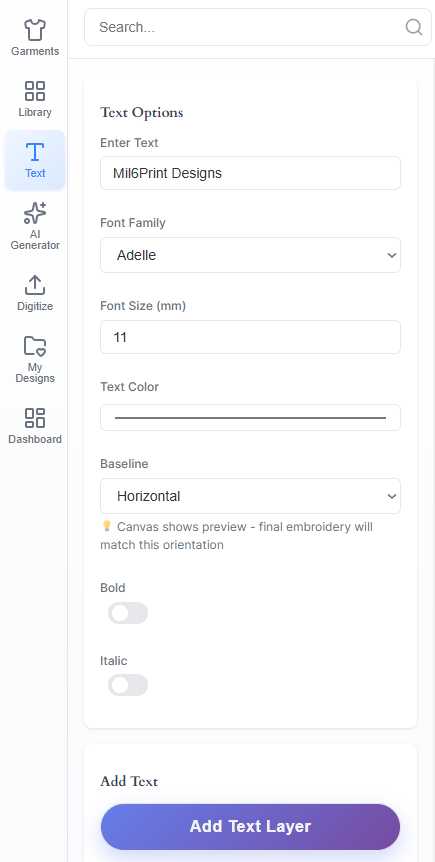
Click on “Text” in the left sidebar
This opens the text panel.
-
Enter Your Text
Type your text in the “Enter Text” field.
-
Select a Font Family
Choose from the available embroidery fonts. Each font has a recommended size range.
-
Set Font Size (mm)
Enter the font size in millimeters. Typical range is 5mm to 50mm.
-
Choose Text Color
Click on the color picker to select your text color.
-
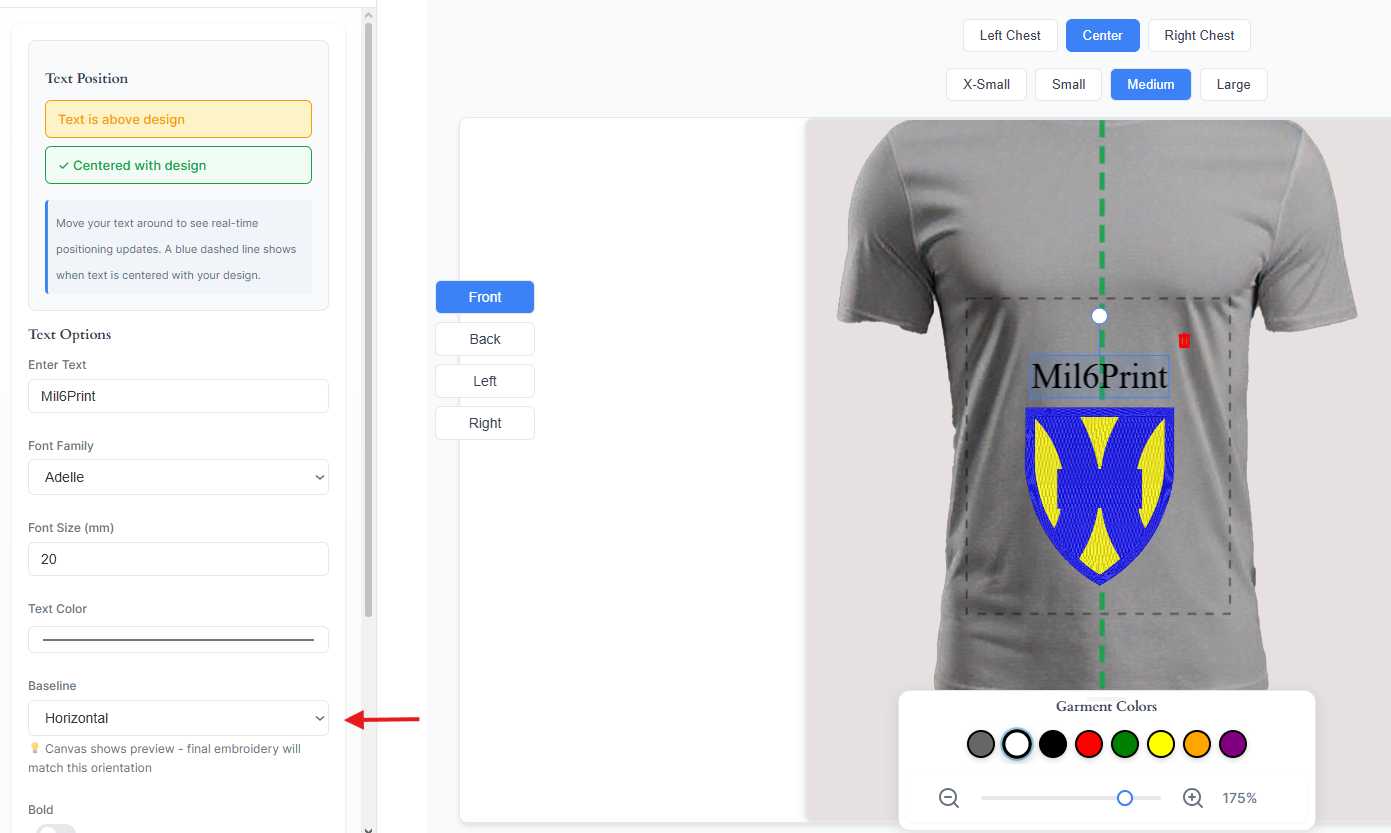
Select Baseline
Choose how your text flows:
- Horizontal – Standard left-to-right text
- Vertical – Text flows top-to-bottom
- Circle Top – Text curves along a circular arc
-
Apply Bold or Italic (Optional)
Toggle Bold or Italic on/off using the switches.
-
Click “Add Text Layer”
This adds your text to the canvas.
-
Position Your Text
Click and drag the text on the canvas to position it. You’ll see real-time positioning feedback.
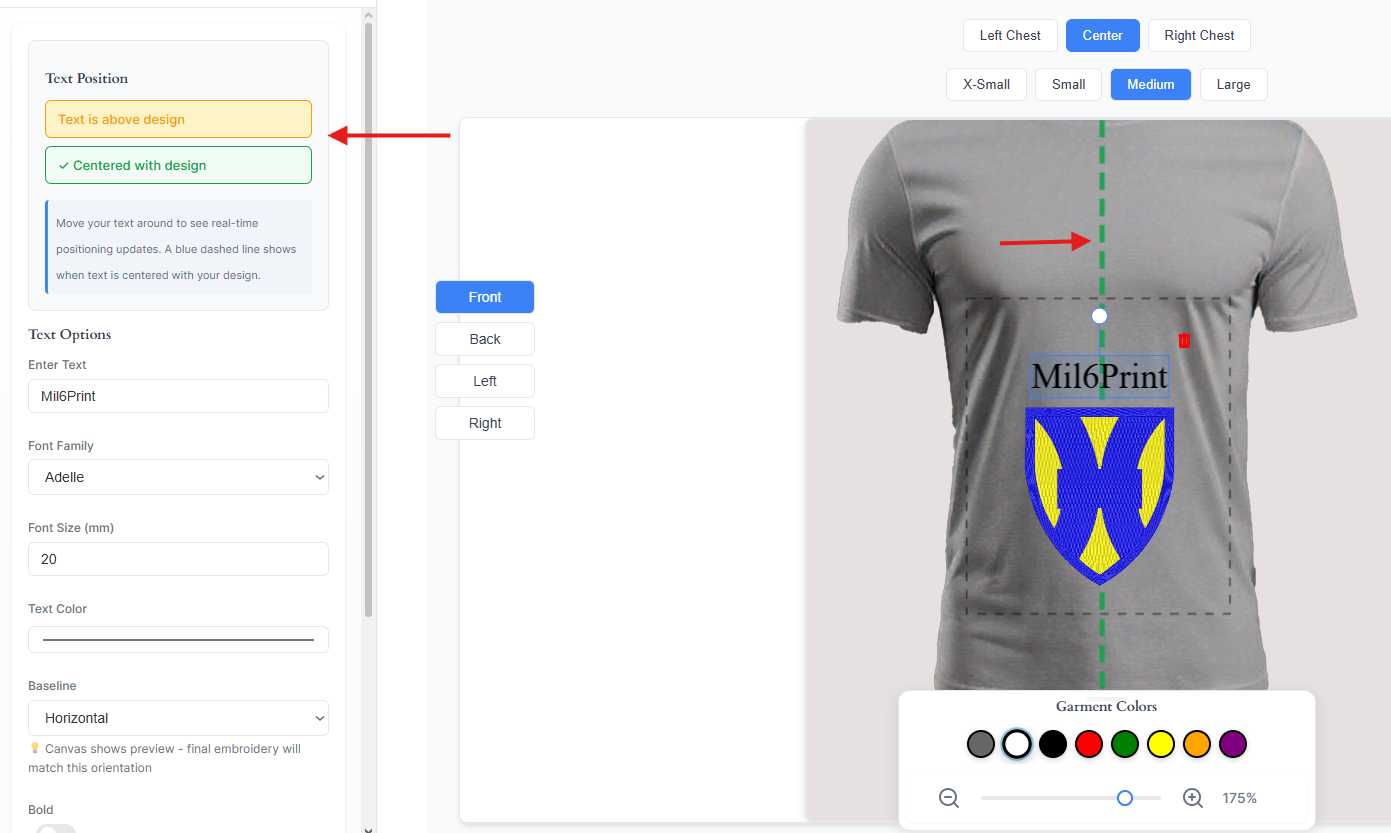
A blue dashed line appears when your text is centered with the design. Use this guide to ensure perfect alignment.
6. Digitizing Your Own Images
Upload your own images (logos, graphics) and convert them to embroidery-ready designs.
Step-by-Step:
-
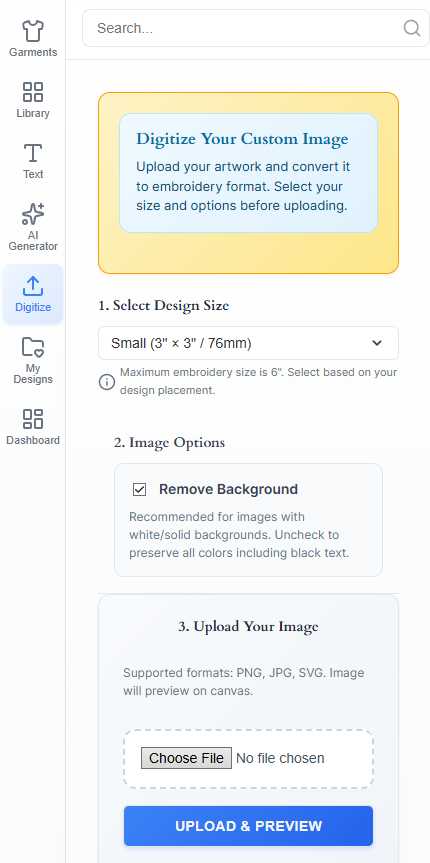
Click on “Digitize” in the left sidebar
This opens the digitization panel.
-
Select Design Size
Choose the size for your embroidery from the dropdown:
- X-Small (2.25″ × 2.25″ / 57mm)
- Small (3″ × 3″ / 76mm)
- Medium (4.7″ × 4.7″ / 120mm)
- Large (5.9″ × 5.9″ / 150mm)
-
Choose Image Options
Remove Background – Check this option to automatically remove white/solid backgrounds from your image. Recommended for most images.
TipIf your image has black text or elements on a white background, try UNCHECKING “Remove Background” to preserve all colors.
-
Upload Your Image
Click “Choose File” and select your image. Supported formats: PNG, JPG, SVG.
-
Click “Upload & Preview”
Your image will be processed and added to the canvas for preview.
- ✅ Logos and text
- ✅ Simple graphics with solid colors
- ✅ High-resolution images (300+ DPI)
- ❌ Photos of faces
- ❌ Images with complex gradients
- ❌ Low-resolution or blurry images
7. AI Design Generator
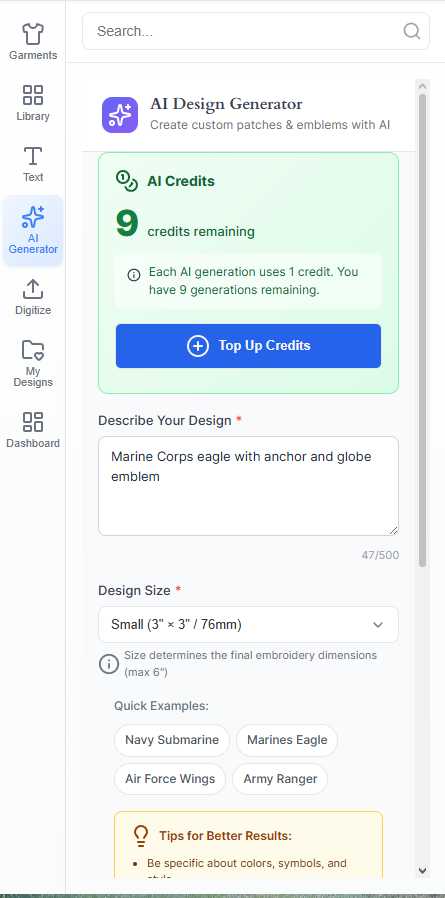
Create unique embroidery designs using artificial intelligence. This feature requires AI credits.
Understanding AI Credits
Each AI generation uses 1 credit. You can see your remaining credits at the top of the AI panel. Click “Top Up Credits” to purchase more.
Step-by-Step:
- Click on “AI Generator” in the left sidebar
-
Check Your Credits
Ensure you have at least 1 credit available.
-
Write a Description
Describe the design you want in the text area. Be specific about elements, colors, and style.
Example: “Navy submarine with waves and American flag, military patch style”
-
Select Design Size
Choose X-Small, Small, Medium, or Large.
-
Click “Generate Design”
Wait while the AI creates your design. This may take a few moments.
Tips for Better AI Results
- Be specific about colors and style
- Mention “patch style” or “emblem style” for embroidery-friendly results
- Describe the main elements clearly
- Use the quick example tags for inspiration
8. Working with the Canvas
Zoom Controls
Use the zoom controls at the bottom of the canvas to zoom in and out:
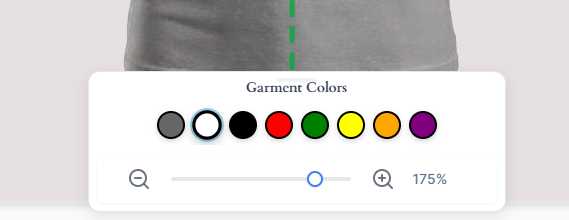
- ➖ – Zoom out
- Slider – Drag to adjust zoom level
- ➕ – Zoom in
- Percentage – Shows current zoom level (50% – 200%)
Changing Garment Color
Click on the colored circles below “Garment Colors” to change the garment color:
Moving Design Elements
To move a design or text on the canvas:
- Click on the element to select it
- Drag it to the desired position
- Watch for alignment guides (blue dashed lines) to help center your design
Reset View
Click the reset button (↺) in the top toolbar to reset the canvas view to default.
9. Saving & Sharing Designs
Saving Your Design
-
Click “Design” in the top toolbar
This saves your current design.
-
Check “Save to My Library” (Optional)
During digitization, you can save the design to your library for future use.
Auto-Save Feature
Enable Auto-Save to automatically save your work:
- Click “Auto-Save: OFF” in the top toolbar
- It will change to “Auto-Save: ON”
- Your design will be saved automatically as you work
Sharing Your Design
- Click “Share” in the top toolbar
- A shareable link will be generated
- Copy the link and share with others
10. Managing Your Designs
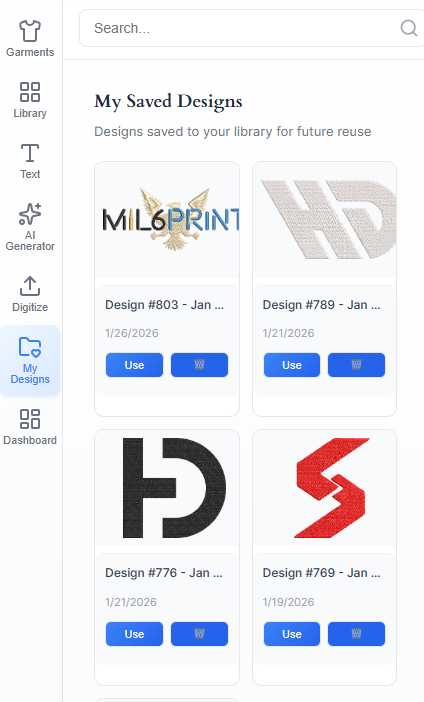
Access your saved designs in the “My Designs” panel. (Login required)
Loading a Saved Design
- Click on “My Designs” in the left sidebar
- Browse your saved designs
- Click on a design to load it onto the canvas
Deleting a Saved Design
- Hover over the design you want to delete
- Click the delete/trash icon
- Confirm the deletion
11. Downloading Embroidery Files
After completing your design, follow these steps to get your embroidery files:
Step-by-Step:
-
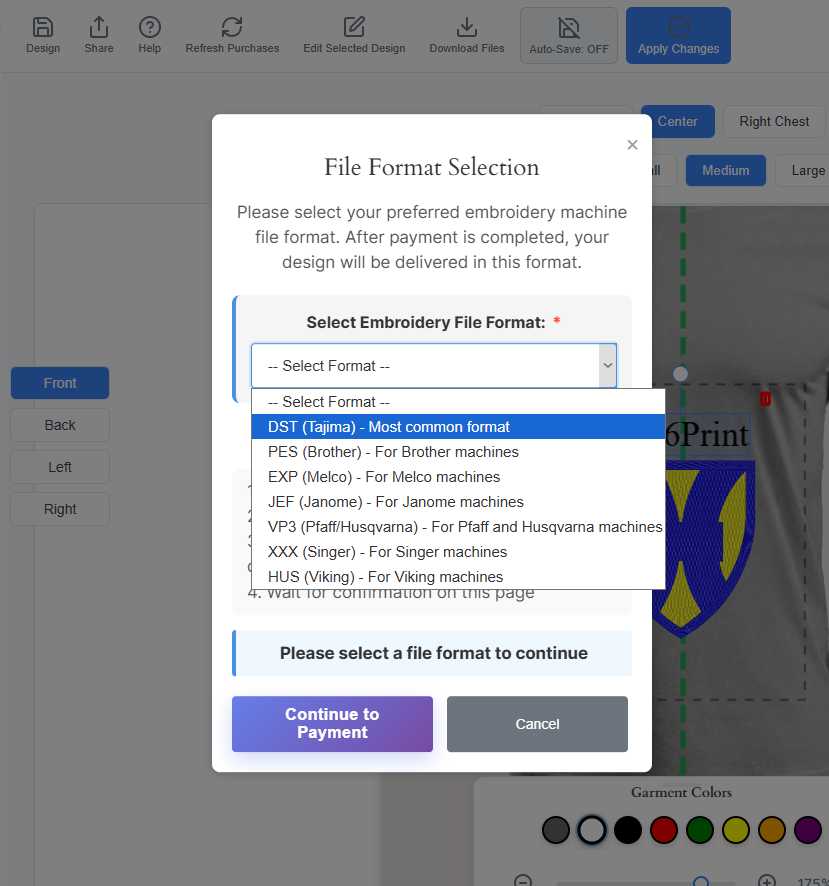
Click “Apply Changes” in the top toolbar
A payment modal will appear.
-
Select Your File Format
Choose the embroidery file format for your machine:
- DST (Tajima) – Most common format, works with most machines
- PES (Brother) – For Brother embroidery machines
-
Complete Payment
Follow the payment process to complete your purchase.
-
Download Your Files
After payment, your files will be available for download and you can instantly access it via “Download Files” button at the top after the successfully payment. You can also access them later from the Dashboard.
Accessing Files Later
If you need to download your files again:
- Click “Dashboard” in the left sidebar
- Find your order in the orders list
- Click the download link
12. Troubleshooting & FAQ
My purchased designs are not showing
Click “Refresh Purchases” in the top toolbar. This syncs your purchases from the main shop.
I can’t access certain panels
Make sure you have selected a garment first. Most features require a garment to be selected before they become available.
My text alignment looks wrong
Ensure your text box is not wider than the design area. See Section 5 for detailed guidance on text width and alignment.
The “Edit Selected Design” button is disabled
You need to select a design from “Library” first. Once selected, the Edit button becomes active.
My uploaded image looks wrong
Try these solutions:
- Toggle “Remove Background” on/off and re-upload
- Use a higher resolution image
- Use PNG format for images with transparency
I can’t see size buttons for a design
Size buttons appear after you select a design from the library. Some sizes may not be available depending on your purchase.
My AI credits are not showing
Make sure you are logged in. If still not showing, try refreshing the page.
Need more help?
Contact our support team for additional assistance.